
Introducing Meta Inspector, a versatile library that empowers Maya tool development and customization.
This powerful library is designed to assist tech artists in automating the process of defining and binding UI widgets to their tools. With Meta Inspector, you can streamline the creation of tools and enhance your workflow in no time. You can get the plugin's files in my GitHub page here.
In this blog post, we will explore how this powerful tool can be used to enhance your workflow and extend the capabilities of your projects. Using Meta Inspector is straightforward. Let's dive into some script excerpts to see how this library can be effectively utilized.
The set up:
In this example we will be creating the following UI for the example CopyTrail tool:
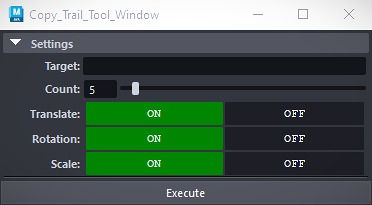
class CopyTrailTool:
    def __init__(self):
        self.target = ""
        self.count = 5
        self.interpolate_translation = True
        self.interpolate_rotation = True
        self.interpolate_scale = True

    def execute(self): ...
Setting up the Tool's class:
First, to utilize the library, you'll need to declare your variables in the class scope and annotate your tool's variables with the predefined annotations provided by Meta Inspector.
Each widget's annotation looks similar to this.
var: Toggle(label="Translate", group="Settings") = value
They all have a label and group arguments defining their label and group placement in the UI panel, some widgets might then have custom arguments like in the int slider's case.
var: IntSlider(label="Count", group="Settings", min=1, max=100) = valueLet's take a look at an example demonstrating how to annotate a Python object using Meta Inspector:
from widgets import *
class CopyTrailTool:
    target: TextField(label="Target", group="Settings") = ""
    count: IntSlider(label="Count", group="Settings", min=1, max=100) = 5
    interpolate_translation: Toggle(label="Translate", group="Settings") = True
    interpolate_rotation: Toggle(label="Rotation", group="Settings") = True
    interpolate_scale: Toggle(label="Scale", group="Settings") = True

    def execute(self): ...
The annotations will be processed by the library to automatically generate a column layout element filled with the necessary widgets.
Building the window:
Next, let's explore how to build a window using the Inspector Panel from Meta Inspector.
To set up your window, you can follow the familiar process you would normally use. However, with Meta Inspector, a convenient method called create_panel() is exposed.
inspector.create_panel(TOOL_REF, LABEL_SIZE, *columnLayout_kwargs)
By passing your tool's object reference as the first argument and specifying the desired label size and any additional column layout arguments, the library will automatically generate a column layout filled with all the necessary widgets. This simplifies the process of creating a functional window for your tool.
import inspector

# Instantiate a tool object
tool = CopyTrailTool()

# Build window, base layout then show it
window_element = cmds.window("Window", sizeable=False)
cmds.columnLayout(columnAttach=('both', 0), cw=370)
cmds.showWindow(window_element)

# Create a Inspector panel
inspector.create_panel(ref=tool, label_size=75,
            adj=True, columnAttach=('both', 1),
            adjustableColumn=True, rs=2)

# Create a button to run the tool's execute function
cmds.button(label="Execute", c=lambda *_: tool.execute())
By using the Inspector Panel, you can effortlessly create a window with a customizable UI, allowing users to interact with the annotated variables.
Extending the library:
Finally, Meta Inspector empowers you to extend its functionalities by creating custom widgets. Extensions should implement the Widget class like this.
from engine import Widget

class WIDGET_NAME(Widget, T=WIDGET_T, [label_style=LabelStyle.Left]):
	# You can define custom widget arguments here
	size = 4

	def __widget__(self, bind, default):
		# Here goes your widget's UI's description
		""" cmds.someMayaUiElementCommand() """

  		# Here's how to get and set the widget's tracked variable
  		var = getattr(*bind)
         setattr(*bind, self.size)
Here's an example of a simple custom widget, a text field widget:
from engine import Widget

class TextField(Widget, T=str):
	placeholder = ""

	def __widget__(self, bind, default):
        	""" Create a text field widget """
		def on_update(self, value, *_):
			 setattr(*bind, value)

        	cmds.textField(tcc=on_update, cc=on_update, ec=on_update,
					 text=default, pht=self.placeholder)
With the ability to create custom widgets, you can tailor the Library to suit your specific needs, enhancing the interactivity and functionality of your Maya tools.
Meta Inspector opens up a world of possibilities for Maya tool development and customization. Feel free to explore its potential, and simplify your workflow.
If you have any questions or want to dive deeper into the capabilities of Meta Inspector, feel free to reach out. Happy coding and creating!